Friday, March 30, 2012

Take a load off...


The other day I came across this build your own ottoman on Shanty to Chic's site here. The ottomans are so flippin cute that I knew I had to make them. So I pinned it to my "gonna make it myself" page on Pinterest, and set out to the good old Home Depot. OK I am getting ahead of myself here. First I have to tell you that the plans for these ottomans actually come from this site here by Ana White. The lady is a freak of nature. (That is why I am in no way shape or form going to give you the Angie J tutorial. Instead I will refrence you to her link here.)She shows you how to make anything your heart desires with step by step instructions. She even gives you a cut list for your lumber. Like this...

Neat huh? So then I took my little cut list into the HD and found the first guy who looked like he knew what he was talking about and I showed him my cut list and told him I wanted to make them cheap. Of course you know whats coming next, I told him we can use wood from the cull bin of course, if they had my dimensions. Guess what they did!... All of it. So I got my wood for around four bucks and he cut it ALL for me. I know this might be cheating but who cares. Here is my guy cutting my wood for me... Thanks nameless HD worker... And for those of you who have never witnessed the cull bin, that's it right there.


I was so excited to start this project that I jumped right into it. OK this is where things went wrong and I needed to humble myself. You see I never took woodworking and I don't know the first thing about power tools. My learning curve is super high and I am learning. This one project has taught me patience and how to work a drill like a bad ass. Below is a picture of my hand after I punctured it with a drill bit. I have more respect for power tools and for wood. You cannot just drill into it. The wood cracks without a pre drilled hole and you need to use wood glue. Oh yeah, take it from me and follow each direction and square up constantly or else you will pay and have to redo it over and over again. So needless to say I waited until Cole got off work and we had a little drilling 101 session.
So here is my drilling lesson from Cole on pre drilling and working the drill.
 Here I am working it. Notice all my pre cut lumber. Did I mention they didn't charge me extra to cut it. What!?
 My wood all pre drilled...
 My finished first cube... I am not attempting to tell you how to make this. Ana White as referred above does a much better job so please again follow her directions here.

 Next I cut my foam down for the cushion on top of the ottoman. I used a 3" thick piece instead of 2" thick like they call for. I just measured an extra inch for my fabric. Then I used spray adhesive to glue them to the top of the ottoman. (note: you should spray directly onto the foam then glue it to the wood.)
 OK so Ana White doesn't give you directions on how to make the slip cover. Shanty to Chic does here. Again as I have posted before my learning curve is through the roof with sewing. Lucky for me, Cole's Grandparents are in town from Montana for Spring Break and they were able to assist me and give me guidance over at Cole's Mom's house. Now for you newbies like myself, measuring fabric sucks booty big time, but you have to do it. I wanted two slip covers from two yards. It was like solving a puzzle and I am not good at puzzles. Patience is the name of the game. Which I am also not good at.
 Once the fabric was all cut Lucy Lou admired how nice it would look on her new piece of furniture. Upholstery fabric is spendy! Just save your coupons. I used my 40% off coupon to Joanns. I am pretty sure I purchased an outdoor fabric too. This will help with sticky fingers not to mention I can just throw them in the wash.

 Here I am sewing all the pieces together.
 I was not going to hem the bottom because I hate the pins but Grandma Judy insisted and she's a pro so she very graciously pinned it for me then I sewed the hem line. They look so much better and won't fray out now. Thanks Judy.

And wait for it ...... TaDaaaa.... My finished ottoman. How beautiful...
 Lucy says there is lots of business to be had on this ottoman. Like walking around it and stuff.
 Then I brought them home and look who else loves them. LOLA.... Actually Lola is really vain and probably just wanted her picture taken.
We had some good friends surprise us last night and they were a hit! What is it with my dogs always wanting to be in the picture? Hurley. (Notice we haven't added curtains to the sliding glass doors, which I have plans to make into french doors.) Another post a long time from now.

 They look great in my sitting room/Living room.... Not to mention the 3" of cushion is nice on a tushy...
 Once all is said and done, I would make these again. They were not simple because I did not have the skills to make them right away. Now that I am leaning I could make them again without as much difficulty. One lady said she made them during her kids nap time. Now, unless Lucy takes 8 hour naps I wouldn't agree with this lady. But I am sure I could make them a lot quicker this time. For the price too, you really can't beat it and they are adorable. I want to add some green Pom-poms to the bottom. What do you think?

One last little look...

Thursday, March 29, 2012

Finding that Stud...

When Cole and I got married we got some of the
most amazing dishes and stemware. Oh boy did we get stemware. We had inherited my Grandmas crystal and received a lot of really cool glasses. When we moved into our new house we were psyched to pull out all of our wedding gifts and put them on display. We have lots of cupboard space in our new house, nice tall cupboards. To our surprise though it wasn't enough space. Take a look.....

See those are some full cupboards.

So after I was inspired by all of the open air shelves on Young House Love, I decided I needed one. I also had just the place in mind for my new shelf. We have this big wall next to the fridge with an awkward sized chalkboard. I knew I wanted to do something with the wall but I didn't know what. Here are some pics so you can visualize the wall that needs love. 
Knowing I wanted a new shelf I set out to my local Home Depot. Guess where I headed to first in that grand ol' store? You guessed it the cull bin, and would you believe that I found my shelf board for $0.51. Woop Woop! God I love the cull bin. Now for my not so proud moment. When I went to find the brackets for the shelf they were expensive and they didn't have a great selection. I am not a huge fan of the scroll look which was a few bucks cheaper but I opted for the $9.99 version. Yeah, I paid twenty bucks for the brackets. I guess I rationalized it because I only spent $.51 for the shelf and I had the paint. (Oh yeah the hardware is included with the brackets)


 I added two lovely coats to my shelf and brackets for that semi-gloss finish that I love.
 Then late into the night I solicited the help of Cole to hang the beauty. He was reluctant because he was headed straight to the couch in the family room, beer in hand. Thanks again babe! You are the best. Below you can see Cole struggling with the math. His measurements were not lining up, to our surprise it was because I kept moving the brackets not knowing he was measuring.. Sorry... By the way to all of you instant gratification readers like myself, I have learned that you must find the stud in the wall when hanging things. I have always been a "put a nail in the wall and call it good," kinnda girl. Now that I have Lucy I fear that everything I put on the wall will fall on her sweet head. So I am extra paranoid about finding the stud and making it sturdy. Especially when I am hanging crazy heavy shelves.
 Finding that stud and screwing in the stuff. Looking good Cole. Who knew "we" were so handy.
 Then we hung the shelf and the hardware and I added some finishing touches. Oh yeah "we" re-centered the chalkboard too.
 Done and done. Now we can relax and have a beer... It was ten at night.
I couldn't help but decorate the shelf ASAP. I secretly wanted to make sure it could hold the weight of some sturdy things. So I loaded it up with out margarita glasses..(Yum Margaritas..) Side thought entirely, if you know anything about the Pioneer Woman, which I do. She is awesome. She makes these margaritas that look amazing... Check out her site here and buy the book to get the recipe. They would look so good in my glasses. I also added my big bean pot. I love it and it has been hidden way too long. Anyways, we didn't hear any loud crashes last night which told me the shelf held up. We did hear the wind last night. Yuck. But Lucy slept through it. Yeah!

 Here is Lucy this morning enjoying Grandmas waffles.. She loves them. Oh and look at that shelf behind her. Looking good.
 I must say I am loving my new shelf. I keep moving different things on and off of it. It also adds life to my chalkboard.

Wednesday, March 28, 2012

Roam freely.

We have a ton of  windows in our new house and I love it. There is nothing more spectacular than natural light. OK I take that back.... sunlight is the best light by far and when we get it in Astoria, I am thankful for all my windows. The problem with the windows is that we do not have window coverings. At night I feel like we are on display to the world. It's probably like a little show for all the neighbors. We cook dinner, bathe Lucy, put her to bed, watch TV, get ready for bed and then lights out. But they can see it all. The other day Cole and I got into it because he had just stepped out of the shower and decided to walk around our room to his dresser without his towel. Of course all I can think of is the nice couple across the street sipping coffee reading the newspaper and BAM full frontal Cole. I guess I am more conservative. The sad part about it is that your bedroom is the one place you should be free to hunt for your undies or walk around without pants on. But for fear of running into our neighbors on the street with them thinking of me as the girl with too much to share, I restrain myself. Well, last night we solved our problem. We added curtains! I went to IKEA a couple weeks ago and purchased the prettiest and cheapest curtains I could find and I found... these.RITVA Pair of curtains with tie-backs IKEA Light filtering curtain.
They are stark white but I thought they would make my yellow walls pop. I had considered making my own out of flat sheets but for this price I couldn't even make them myself. Then I paired them with this rod from IKEA
BESKÃ…DA Curtain rod set IKEA Complete set with wall fixtures, curtain rod and finials; ready to mount.

So here are some before and after shots. My house isn't looking too clean so please ignore the mess. I mean I am on Spring Break, so its not like I have time to clean...boring!
Before:
 During:
 After:
Here is a before and after of the entryway/family/sitting area room.
Before and after but still in progress.
 
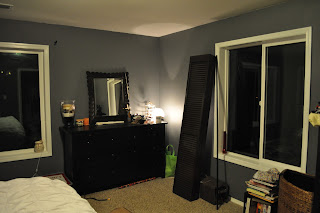
The Master Before... This is a room in progress.
I only bought $100 worth of curtains so the window to the left is the only one that got covered in our bedroom. It was the one that faces right into our neighbors house so it needed it. Again, my dream of you thinking I am a stellar clean person has died. I will get around to it I swear.
Cole hanging the curtain.
After... They look so great. I can't wait until we have this room finished. I have some great ideas to make a DIY bench and headboard. Some nice finishing touches. I just cant decide on the colors for this room. We have painted the walls storm gray so I am thinking yellow and turquoise?

All in all I am really pleased with our simple new upgrade. I definitely don't feel as exposed. We  added curtains to four windows and have about 50 to go...baby steps Angie, baby steps.
 P.S. A few highlights from curtain hanging included Lucy getting in lots of snuggles from her Great Gram and Papa from Montana. She sure appreciated all the curtain hanging help.
A few details from yesterday also include my new awesome blue vintage mason jar I found for like seven bucks, at an antique store which I filled with some roadside daffodils. OOhhhh Pretty...as Lucy would say.

 I also spent a large portion of my day at Home Depot yesterday because today I am making shelves and ottomans. So for those of you who have been messaging me for more stay tuned I have lots of DIY stuff coming.