Wednesday, June 6, 2012

Let's Run Away.... Or at Least Plan to


It is finally time to do something about this map that has been hanging around my house. I know many of you have noticed it before, wondering "what the heck is she gonna do with that?" Well I want to let you in on my master plan. You see I am horrible at geography. I don't know why and I can't pretend to be a super smarty pants because others out there will attest to my mapping abilities. This is not something I want to share but somewhere along my life journey I dropped the ball maybe in social studies. There was even a day when I thought one of my besties Molly was from the East Coast because she was from Minnesota. It rocked my world when I realized Minnesota bordered North Dakota. I knew where N. Dakota was because I lived in Montana at the time and I knew it bordered Montana. I guess I blacked out in 4th grade. Also for all of the mothers of students I have previously taught, be glad I was your child's Kindergarten teacher and nothing more! 
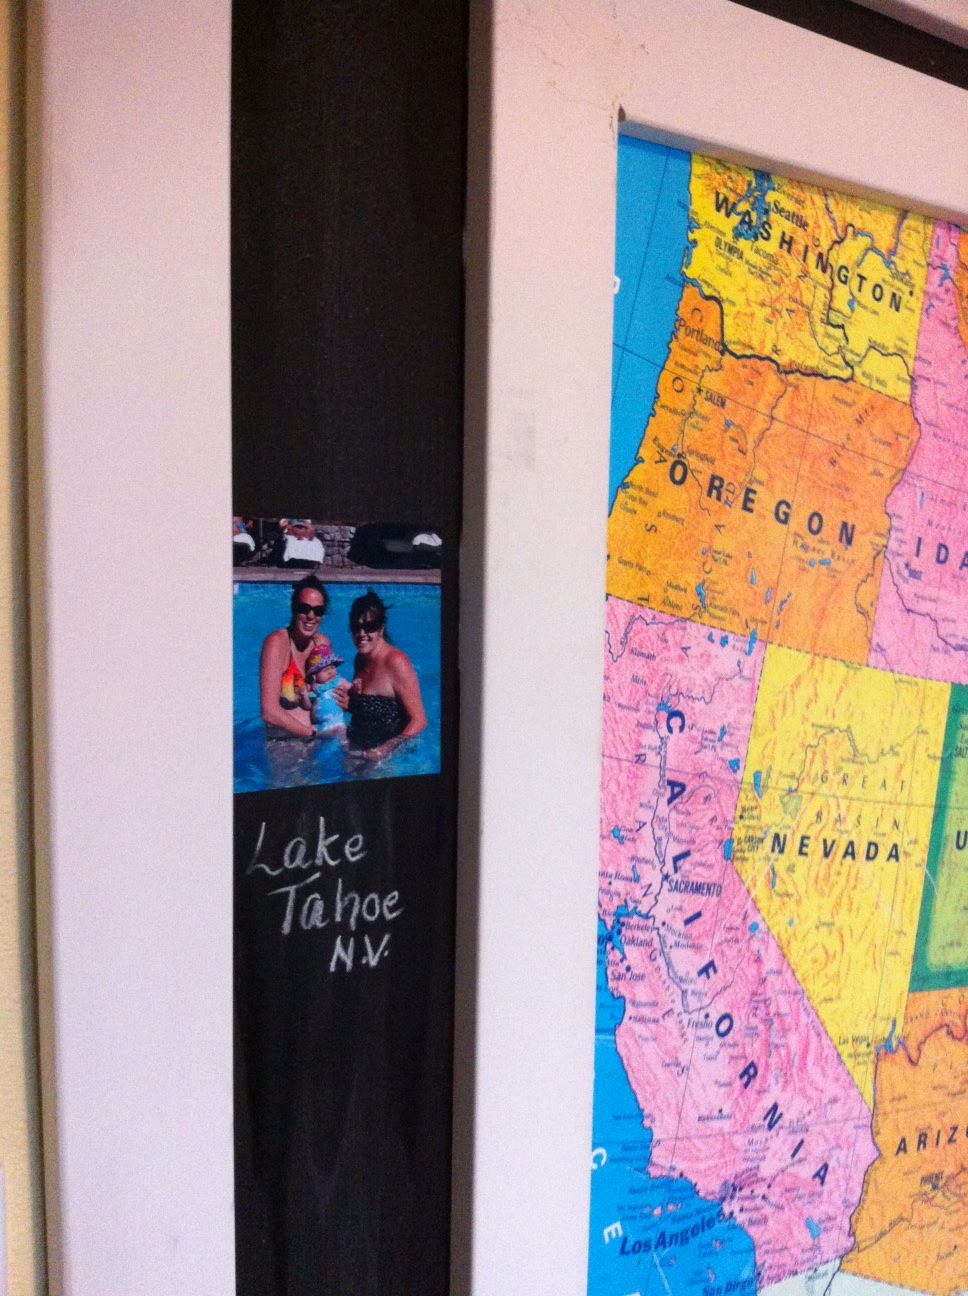
I can't tell you that I am in love with this map but it was an antique I found hidden in the depths of my old classroom closet, which makes it free. Thus, I am using it until I find one I love more. The whole point of this project is for not only my benefit but Lucy's. I want to give her the skills I lack. How amazing will it be to have a map at her disposal with photos of her and her family linking to different states on different journeys. It also opens up to letter recognition, color recognition, story telling, etc, etc. 

Here are my materials :
map
large piece of board cut to size   $8.99 (Home Depot)
1 can of chalkboard spray paint about $4 (also From the HD)
White moulding around $20 all together (HD)
Spray Adhesive already had it (HD)
Liquid nails also already had it (HD)

I fit the map to the board and traced around it making sure all sides are equal. Then traced around it with a sharpie.
 There below is my sharpie line so I knew where I needed to spray paint. I don't like wasting this stuff cause I use it a lot. PS enjoy the view folks
 Cole cutting off the extra stuff... Yes that is a Skil saw... Thanks Dad
Then I spray painted black chalkboard paint around the edges of the board
Next I used spray adhesive and glued the map to the board. Make sure you are measuring so that your dimensions on both parallel sides are equal.

 The next step was the hardest because we did not have the correct tools and it required a lot of math. Cole stepped in for me, thank god. I wanted to use some fancy decorative moulding around the edge but instead I found the cheapest stuff money could buy at Home Depot. I am so happy we purchased the stuff we did because its flat and will be easy to write on or stick pictures to.

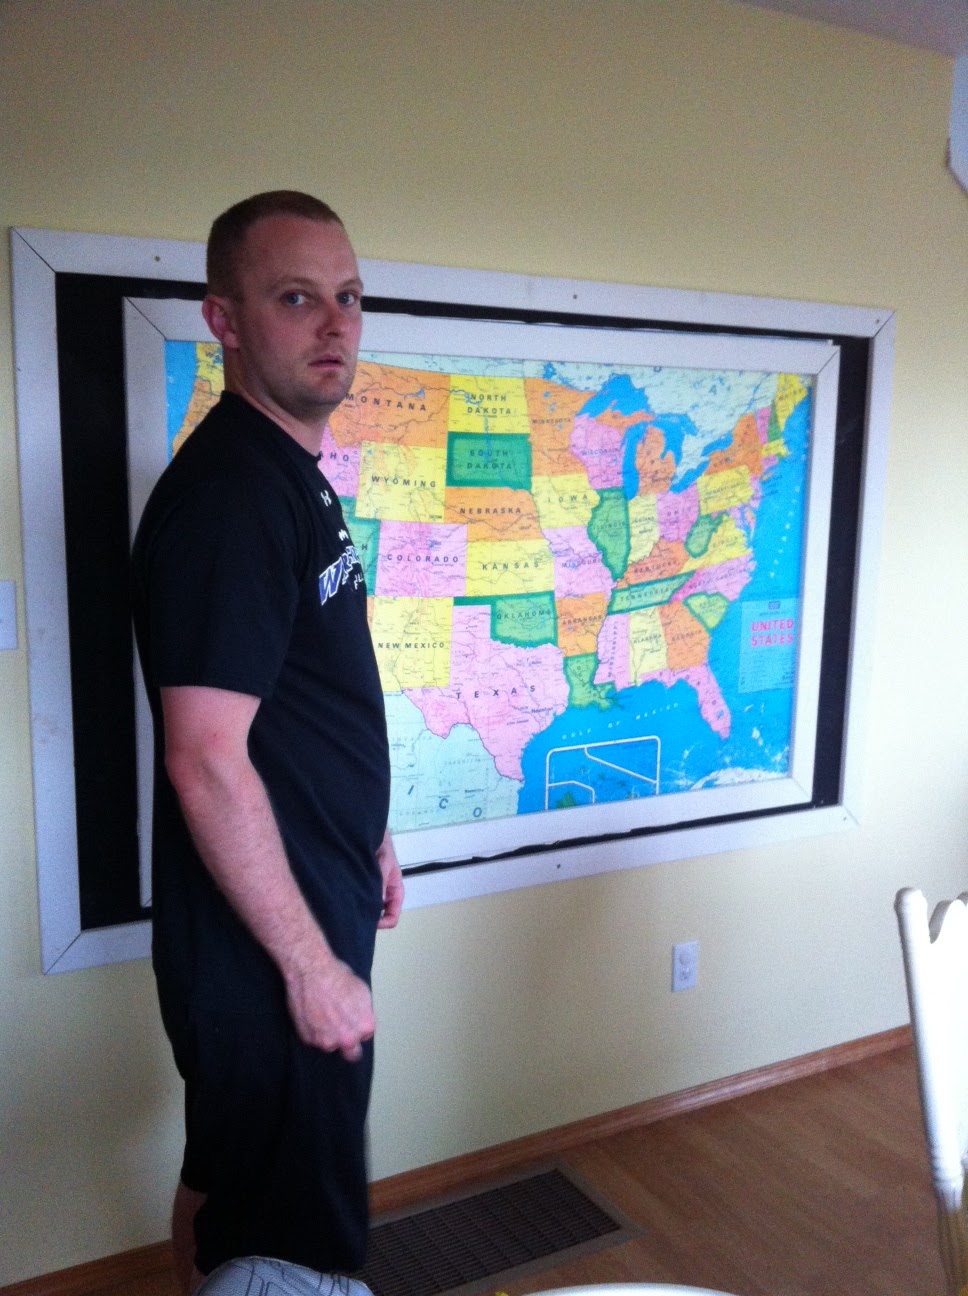
Cole did his damnedest to make the correct angles to make a frame. We were a little off but all he did was measure the length of the end of the board and took that measurement into the length of the board. He drew a line from that mark to the corner then cut it with a skil saw. Could I describe that any worse.. Jeez

 Cutting off the ends....
Then we used liquid nails to piece all the frames together. Then my father-in-law Neil brought over his drill to screw it into the wall. Yeah we have a drill but the battery won't charge so thank god for our local handy man. Love ya Neil!!
 This is a scale shot for you. I wanted to hang it low enough so it can be an interactive piece for Lucy to touch and read.
 Here is a close up of how hard making corners is.. YIKES... anyways we just used white grout to fill it in. Nice
 If you decide to do this do not make the same mistake we did. We needed to measure our boards to fit longer so we can have more picture space and writing space.


 Lola aka "Misery" ..... I can't tell if she is impressed or not.
 I really like the piece. It was a lot harder than I thought to put together. However, I think this will serve as a great conversation piece and a wonderful learning tool for Lucy. Its not fine art but it's sentimental art. We made it and will continue to create it.


Let me know what you think. Sorry this is the worlds longest post but it was worth it. 

Thursday, May 31, 2012

A new place to call home....?

I finally did it! By "it" I mean finished the hutch I purchased forever ago off of Craigslist..... Remember from this post here....?


 It has been hiding in my dark, dirty garage for several months now but after I cleaned out my garage this past weekend I was inspired to finish it. It was collecting more dust and getting destroyed by other DIY projects. For example, when I was spraying the lamp I accidentally sprayed part of the hutch see..... Ooops
This really bummed me out because I wasn't sure that I wanted to paint it. I kinda liked the two toned wood color. But now I was stuck to paint the beast. I really didn't know what color I wanted to paint it. I knew I needed to mute down the bright colors in my house because I am out of control with color. That's when I found myself in Home Depot picking a navy blue color.

Here is the hutch all washed up ready for it's first coat.... The Before...
Here she is all sprayed out after one coat. ( I did three.) I kinnda freaked at first because the paint did not look navy at all until it dried.


Now this peice is old and musty smelling. So I took out my wood cleaner washed it down. Then I took some decorative papers I had and lined the drawer and doors with them.

 I did this with spray adhesive. I love this stuff by the way...

Then it was time to purchase some new hardware for the hutch. So I headed down to my local vintage hardware store where I purchased four knobs; two for the drawer and two for the doors. (I still am not 100% sold on the light blue knobs. I might exchange them for yellow.)


So are you ready for the before and after!!??? Here we go....
Before
After
 Sorry the pictures are washed out. I had to take these on my phone since our camera battery is dead....
The Hutch works in our house. It is growing on me day by day...

 I am constantly changing whats on top of the hutch but for the sake of these pictures I have one of my long time favorite post cards called "Hey Hey Sugarcube." Oh and there is the wise old owl candle holder.
 On the other side of the hutch I have my DIY spray painted mason jars....
 Look how stunning the decorative paper looks lining the drawer. I am in love with it. Not to mention I love the color orange!!! LOVE LOVE IT!

Now I need to explain the title of this post to you. You see since the minute we brought this piece in the house, Lucy has discovered it as her new little home. She loves to open and close the doors, sit inside it and close herself in it. It scares the heart out of me that shes going to crush a finger or somthing... But she loves it like crazy. See....

 Open close.. Open close... All the other cupboards in our house have magnetic locks... This is freedom...
Here she is trying to save her best friend Weston from the dogs by helping him hide in the hutch... Best place ever....

 To say the least we love staring at our new fun furniture piece in the house.... Did I mention that there is a mirror over the hutch so we can stare at ourselves. We really like doing that too because we both think we are pretty funny making each other laugh a lot....


What do you think?


Wednesday, May 30, 2012

Deer be Gone

 I think Cole and I have given new meaning to the term "Weekend Warrior." This past weekend was Memorial Day weekend and I had a list a mile long that I wanted to finish around the house.
      • Clean the garage   'check' 
      • Wash the cars
      • Strip, Wash and Stain the Deck    'BIG check'
      • Finish hutch    'check'
      • Finish Map on wall   'almost check'
      • Add plants to raised bed    'check'
      • Plant deer proof plants in the new flower bed in front   'check'
I guess this list gives you some insight as to what has been happening around these parts. We rocked our house out and most of all we stained our deck! I had no idea how intensive this would be when we got into it!  I will share more details in a later post but boy.... what an accomplishment!!!

What I want to share with you today is our new flower bed in the front of the house. Remember how I told you a while ago that we have deer?.... Lot's of deer!!! Well I have been really gun shy to plant anything in this bed for fear of it being munched to death. So after several weeks of researching and talking to some of the local garden centers in town I have decided to plant an herbaceous garden in front. The master gardeners at the Sunday market told me that there is no such thing as a "deer proof" garden, however there are deer resistant plants. Then there was a guy at our local farm and garden store who told me that deer hate lavender and rosemary. YES! I thought to myself I love lavender and it smells so good! It was then that I decided to buy several lavender plants which I got at our local Sunday market 5 for $20. Nice price huh? Then I also bought some baby tears and a spreading succulent and several rosemary bushes. Then I weeded the bed a bit and went to town planting.... Here is a view of the yard before we dug out a bed. This will make mowing the yard a ton easier too!

Here is a side view after..... Those taller plants are the lavender. They should bloom in about a week or so.
There it is all dug out.
Lavender.... I can't wait for the calming aroma.... We need it...

 Here are the baby tear and succulent plants that should spread nicely as a ground cover...
Oh yeah... Here is a mole hole... What the ..... Cole and I are beside ourselves... We do not want moles. If you have any tricks as to how to get rid of them TELL US!!!!


Here is a picture too of our raised bed with more plants in it!!! We check it all the time. I can't wait for the day when we can harvest food out of it... Oh the sweet joy... PS please take note of the new fence around the bed... Our attempt at dog proofing, so far so good!

Ok so again here is a before picture.....

And after... I think it adds curb appeal... One baby step at a time...

I would of never considered myself to be a weekend warrior or ever thought that I would want to be. But the satisfaction we get when we sit back and say... Hey WE did that ... It feels SO good....